Contents
- What is a Purchase Order?
- Create a Purchase Order
- Edit a Purchase Order
- Cancel / Delete a Purchase Order
What is a Purchase Order?
A Purchase Order (PO) is a product manifest created by clients in their Dashboard that notifies Badger of the products and quantities expected for receipt. Acting as the Advanced Shipment Notice (ASN), the PO serves as the reference document Badger uses to scan, verify, and receive inbound inventory.
Clients are required to enter a Purchase Order for all inbound shipments, product transfers, or Badger Work Order receipts.
Enter one PO per shipment delivery, transfer, or Work Order (i.e. for two separate deliveries arriving on the same day, enter two POs).
Any physical product intended to be received and managed in Badger's warehouse must have a corresponding SKU added to the PO (including inserts, stickers, samples, packaging, marketing or project materials, components, etc.).
In order to add Products to a Purchase Order, the Product-SKUs must first be set up in your Products Dashboard (see Products Category).
Create a Purchase Order
- Navigate to your Purchase Orders Dashboard and select Create Purchase Order.
Dashboard → Inventory → Purchase Orders
- Fill out the following required PO Details and then select Next Step.
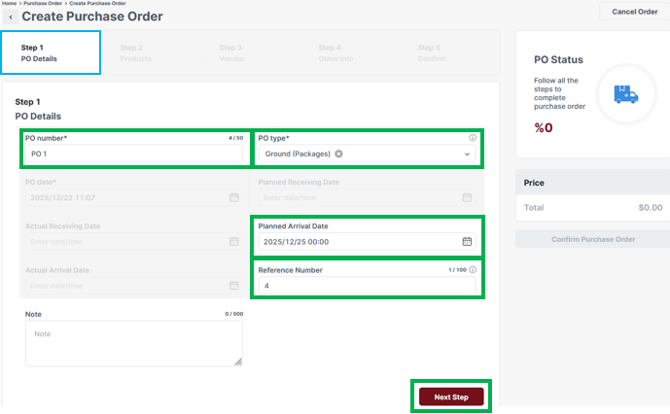
- PO number: Client-defined Purchase Order ID (example: manufacturer or vendor PO #). For a Badger Work Order PO, this code should be the same as, or similar to, the Shipment/Work Order code, if applicable. Please keep the PO number under 20 characters, including spaces.
- PO type: Dropdown and select the PO Type:
- Small Parcel: boxes delivered via small box truck or van (i.e. USPS, FedEx, or UPS).
- Freight: product delivered on pallets via freight truck or trailer.
- Container: boxes delivered on the floor of a container or trailer (not on pallets), requiring Badger offload by hand.
- PetDine Transfer: pallet transfer from "Petdine / ADM" manufacturer in Harvard IL.
- EHP Transfer: pallet transfer from "Elite Health Partners" manufacturer in Harvard IL.
- Work Order: receiving finished items from a Badger Work Order.
- *Planned Arrival Date: the date the shipment is expected to deliver to Badger's warehouse, or the date product is ready for transfer at one of the manufacturers in Harvard IL. For Badger Work Orders, leave this field empty.
- *Reference Number: shipment handling unit quantity (Example: for an inbound shipment or transfer consisting of three pallets, enter "3"; similarly, if 4 boxes are arriving via ground carrier, enter "4"). For Badger Work Orders, leave this field empty.
*Be sure to have the 1) Planned Arrival Date and 2) Reference Number entered at least 2 business days prior to delivery for Ground and Standard Freight, or at least 4 business days for Floor Loaded Freight.
- Add Products to the PO. Enter a SKU or Name in the search field; enter the planned receipt quantity (primary Pack Type UOM total QTY) and then select the + icon.

- Pack Type: leave as the primary Pack Type UOM.
If you set up additional Pack Types in the Products Dashboard, Badger will receive product according to the physical pack configuration inbounded (inventory reports will display both Pack Types and quantities). - Quantity: expected receipt quantity (primary Pack Type UOM total QTY).
- Select Apply
- Repeat these steps for each Product contained in the shipment delivery or Work Order. For each SKU Pack Type, only one line item containing total receipt quantity should be included on the PO.
If you cannot find a SKU in the search field, the Product may not exist in your Dashboard; for active Products recently created in a connected store (i.e. Shopify), wait at least 12 hours for new SKUs to sync and become available in your Dashboard.
- Pack Type: leave as the primary Pack Type UOM.
- Once all Products are added, select Next Step

- A vendor must be assigned; a vendor is a company / place from which your products are shipped from (i.e. manufacturer, co-man, supplier, etc.). If you do not want to track specific Vendor information, create and assign a vendor under your company information.
- To create a new vendor, select Add New Vendor; enter required information and then select Save.

- To assign a vendor, select the checkbox to the left of the vendor name in the vendor list. Then, select Next Step.

- To create a new vendor, select Add New Vendor; enter required information and then select Save.
- Enter the shipment carrier information (Carrier Name, & Tracking Information such as tracking # or BOL #). Leave these fields empty for Badger product transfers or Work Orders. Then select Next Step.

- Lastly, review the PO summary and then select Confirm Purchase Order.

- Select Go Back To Purchase Order List to return to the main Purchase Orders Dashboard.

The PO is now "live" in your Purchase Orders Dashboard, ready for receiving.
- Select Go Back To Purchase Order List to return to the main Purchase Orders Dashboard.

You have successfully created a Purchase Order.
If you completely filled out all PO details (including accurate Planned Arrival Date, and shipment handling-unit quantity in the Reference Number field), you have completed the requirement for scheduling an inbound shipment / transfer to Badger’s warehouse. No additional actions or notifications are needed.
If you need to modify or add information to the PO, you can return to the Purchase Orders Dashboard, to edit.
Remember to finalize all PO details by the Planned Arrival Date (for inbounds and transfers) or by the time of Work Order request.
Bulk Create Purchase Orders
If adding many products or creating multiple POs, you have the option to bulk-create Purchase Orders, using an Excel template.
- Download the Badger Import Purchase Orders Excel Template
- Fill out necessary PO information, and save the file; red column headers are required. Reference detailed field descriptions from Create a Purchase Order instructions above.
- Vendor Info: the designated Vendor must exist in your Dashboard prior to importing the file. Create a Vendor profile in your Dashboard: Dashboard -> Settings -> Vendors -> Create Vendor. Enter the 'Vendor Name' and 'Vendor Display Name' on the Import file.
- CustomFieldTextBox1: Carrier Name
- CustomFieldTextBox2: Carrier Tracking Info
- Navigate to the 'Import Purchase Orders' page.
Dashboard -> Inventory -> Purchase Orders -> Import -> Import Purchase Orders
- Drag and drop your files in the window or click to browse. Your files will populate below. Select Upload, and then select Import on the next screen.

- View the import status in the lower window (you may need to select the refresh button). If the import is successful, the Status will show "Successful". If the import is unsuccessful, select the three dots -> Details, under 'Actions', to reference any error messages.

- Lastly, double check the Purchase Orders were properly created in the Purchase Orders page.
Edit a Purchase Order
- Navigate to your Purchase Orders Dashboard. Select a PO Number in the list to edit (the Status must be Pending in order to edit).
Dashboard -> Inventory -> Purchase Orders
- Navigate by selecting the tabs at the top of the PO.

- Edit PO Details. Be sure to have accurate information entered at least 2 business days prior to delivery for Ground and Standard Freight, or at least 4 business days for Floor Loaded Freight.

- Edit Products
- To delete a Product, select the three dots to the right of the SKU, and select 'Delete'. Confirm 'Remove Product' on the pop-up screen.

- To edit a Product quantity, select the three dots to the right of the SKU, and select Edit. Adjust the Quantity (and/or Pack Type) in the 'Edit Product' screen, then select 'Apply'.

- To delete a Product, select the three dots to the right of the SKU, and select 'Delete'. Confirm 'Remove Product' on the pop-up screen.
- After making any updates, select 'Save Purchase Order'.

You have successfully updated your Purchase Order. The PO is "live" in the Purchase Orders Dashboard, ready for receiving. No additional actions or notifications are needed.
Cancel / Delete a Purchase Order
To cancel or delete a Purchase Order, the PO Status must be "Pending"; a PO with a "Cancelled" status can be deleted. A cancelled PO will remain in your Purchase Orders Dashboard for future reference.
After cancelling a Purchase Order, the Status can not be changed back to "Pending".
- From your Purchase Orders Dashboard, select the checkbox to the left of the PO Number, then select 'Cancel Order' or 'Delete'. Confirm this action on the pop-up screen.
Dashboard -> Inventory -> Purchase Orders
- Alternatively, from the 'Edit Purchase Order' page, select 'Cancel Order' or 'Delete Order' under the 'Other Actions' dropdown. Confirm this action on the pop-up screen.

- Alternatively, from the 'Edit Purchase Order' page, select 'Cancel Order' or 'Delete Order' under the 'Other Actions' dropdown. Confirm this action on the pop-up screen.