
Contents
Overview
This article explains how to prepare your ecommerce product listings for import into your Badger Dashboard, where you will manage your SKUs, inventory, and order fulfillment.
A product listing is the product page in your ecommerce platform (such as Shopify or WooCommerce). Each product listing may contain one or more variants, each with its own unique SKU code. During the import process, Badger's WMS uses these SKU codes to create the corresponding SKUs in your Dashboard.
A SKU is the master inventory record in the WMS and may represent either a single physical item (Product SKU) or a combination of items fulfilled together (Kit SKU).
Once your ecommerce store is connected, new active product listings are automatically imported, creating the corresponding SKUs in your Dashboard.
New SKUs are imported for the first time each day at 12:00 AM CT. Keep this schedule in mind when planning inbound Purchase Orders to ensure Badger's minimum Advanced Shipment Notice (ASN) requirement can be met.
Before product listings can be imported into your Dashboard, they must be properly configured. Following the requirements in this article helps ensure a successful import. After import, additional SKU configuration in your Dashboard is required before inventory can be received or orders can be fulfilled.
For new clients completing onboarding: Complete this step before submitting your Onboarding Kickoff Form. After your ecommerce store has been integrated and your SKUs have been imported, Badger will provide the next steps for configuring your SKUs in the Dashboard.
Prepare Your Product Listings
Before importing your product listings, complete the following three steps within each product page in your ecommerce platform:
1. Assign SKU Codes and Barcodes
Assign a unique SKU code to each product variant. A SKU code is required for the variant to be imported into your Dashboard.
SKU Code Requirements
| Requirement | Value |
|---|---|
| Minimum Length | 3 characters |
| Maximum Length | 16 characters |
Longer SKU codes are supported up to the system limit; however, shorter, descriptive SKU codes are generally easier to manage and help reduce the potential for errors.
SKU codes that do not meet these requirements may fail to import or cause synchronization issues.
⚠️ Important: Finalize SKU codes before assigning them to your product listings. After a SKU has been imported into your Dashboard, changes made to the SKU code or other product information in your ecommerce platform are not automatically synchronized and must be updated manually in the Dashboard.
Also assign the product's barcode or UPC. This should match the physical barcode printed on the product packaging, which is scanned during receiving and order fulfillment.
Example (Shopify):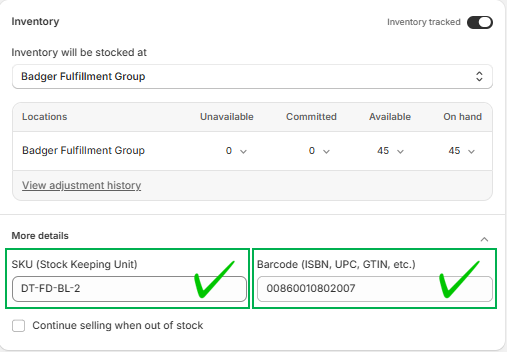
2. Enter Customs Information
Enter the HS Tariff Code and Country of Origin for each product listing. This information is required when rate shopping shipments to international and military (APO/FPO/DPO) destinations.
If your ecommerce platform supports these fields, we recommend populating them on each product listing so they are imported automatically into your Dashboard. Otherwise, they can be entered directly in your Dashboard after import.
Example (Shopify):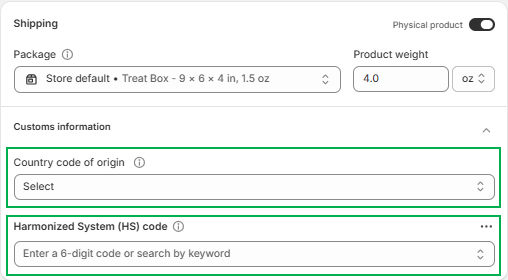
3. Set the Product Status to Active
The product status must be Active (not Draft) for the product listing to be imported into your Dashboard.
Example (Shopify):
Next Step
New Clients (Onboarding)
Continue to Complete Store Integration Requirements to complete the required setup steps and gather the integration information you'll provide on your Onboarding Kickoff Form. Once submitted, Badger will use this information to integrate your ecommerce store with the WMS.
➡️ Complete Store Integration Requirements
Existing Clients
After creating new product listings, wait for the WMS to import the corresponding SKUs into your Dashboard. Once the import is complete, proceed to Set Up Store SKUs to configure the new SKUs before receiving inventory or including on shipment orders.